Showing posts with label Food. Show all posts

Saturday, May 12, 2012

Brown Rice Sunflower Seed Cracker Recipe


I have been making rennet cheeses lately with all the goat milk I have been getting from our goats. My husband has never liked chevre but I decided to make it anyway because of how little work is involved. He tried it after I made it and liked it but wanted crackers to eat it with. So I looked for a cracker recipe. I used this recipe as a guide but changed the ingredients to use what I have on hand. We have been out of almonds so I used raw sunflower seeds. I just used a little salt for flavor because some of the chevre I made is flavored with sweet ingredients.

As a snack, we topped these crackers with the plain chevre. Then for dessert, I topped these crackers with chevre and a drizzle of honey and my husband topped his with chevre and dried fig...so delicious! We finished the crackers in one day, so I will probably double the batch next time.

Brown Rice Sunflower Seed Cracker Recipe


1/2 cup brown rice flour
1/4 cup ground flax seed
1/2 cup sunflower seeds
1/4 tsp baking soda
1/4 tsp salt

2 tbsp coconut oil
1/4 cup water

Preheat oven to 350F degrees.

Grease a baking sheet.

Grind up the sunflower seeds. Mix all of the dry ingredients in a bowl. Add the liquid ingredients and mix until a dough is formed. Make two balls of dough.

Put one ball of dough in between two sheets of wax or parchment paper and roll out to 1/8 to 1/4 of an inch. Pull off the top sheet of paper and flip the dough onto the baking sheet. Use a pizza cutter to cut crackers into 1 to 1 1/2 inch squares. Take the edges off and add to the other ball of dough and repeat.

Bake for 15-18 minutes. (I rolled mine real thin and baked for 15 minutes.)

Let cool on baking sheet.

Makes 30-35 crackers.

This article is shared at Allergy Free Wednesdays.

Friday, February 17, 2012

What Kind of Oats Should I Buy?


There are many different ways you can buy oats - oat groats, steel cut oats, rolled oats, old fashioned  rolled oats, quick oats, instant oats, irish oats, and scottish oats. We have been having oats a couple of times a week since learning the correct way to prepare them. I have been buying organic old fashioned rolled oats and I was going to update my amazon subscribe and save account when I decided to research which oats are the least processed and healthiest to purchase. I will explain the differences below:

Oat groats are the the hulled oat grain. This is the most unprocessed version that you can get at the health food store. Oat groats look like brown rice. I have never cooked with oat groats.

Steel cut oats or Irish oats are oat groats that have been cut into three or four pieces with steel blades. This is the most nutritious version of oats that people are used to eating because it still contains the oat bran and it is NOT steamed before it gets to the consumer. These oats are also more chewier when cooked.

Scottish oats are oat groats that are ground up to make a porridge creamy style of oatmeal.

Rolled oats are made by steaming the oat groats and then using a roller to flatten them, hence the name "rolled" oats. Old fashioned rolled oats are thicker because they are made with the whole oat groats. Quick cooking rolled oats are made using steel cut oats.

Instant oats are quick cooking rolled oats that have been steamed longer and are rolled more thinly. These are the least nutritious of all oats because the steaming cooks the oats which reduces the nutritional value.

I am currently using old fashioned rolled oats but I plan on switching back to steel cut oats after learning the differences. I don't like how the rolled oats are steamed before they get to me, the consumer. I do prepare my oats the correct way by soaking them for 12-24 hours in water and sour milk which reduces the phytic acid making the oats more digestable. I then proceed to cook them by making baked oatmeal or soaked oat breakfast bread.

Monday, January 9, 2012

Natural Burn Remedy That Works - Aloe

I had dinner in the oven and was trying to get all the dishes done before the casserole was done cooking. I grabbed the saucepan off the stove to wash, not realizing it was still hot, and put my hand on the bottom. Owww! This was the worst I had ever burnt myself. I put a bag of frozen green beans on it but realized I had to do more because this was a really bad burn. My husband was on the computer so I asked him to look up what to put on a burn. He said aloe will work so he went outside and pulled some aloe off one of our aloe plants. Within minutes the burning had stopped. I kept re-applying the aloe until I went to bed and the next morning I was fine. No blisters. Two of my fingers were slightly red but no pain. Aloe really works for burns! Every cook should have an aloe plant in their backyard just for burns. Now that I have discovered this remedy, I will never have another burn scar on my hands again.

Wednesday, January 4, 2012

Homemade Raw Milk Yogurt

I have made yogurt once before a few years ago with raw milk and it came out good. But I never made it again as I never had the time. My mother has always made her own yogurt since I was a kid. She always boiled the milk first. I have since learned that raw milk is more nutritious and boiling the milk kills the good and bad bacteria. We only buy raw milk now, at least until we have our own goats and cow. We had too much milk in the fridge so I decided to make some yogurt as I have been craving a yogurt smoothie.


I boiled some water and poured it into the mason jar I was going to use to sterilize it. Then I heated up the milk. I don't have a thermometer so I guessed the temperature. It was probably around 100 degrees. I was really just trying to get it a little warmed up. Then I put a heaping tablespoon of store bought yogurt. I used Stoneyfield Farms plain yogurt. I stirred it with a spoon, covered it, and put it in the oven with the light on overnight. In the morning I had beautiful yogurt. You could see the cream floated to the top. The yogurt tasted amazing and it was nice and thick, not watery at all.

Sunday, December 18, 2011

Homemade Raw Grassfed Butter


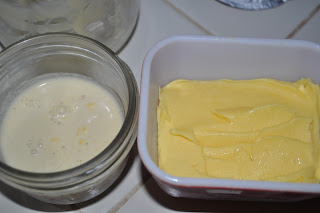
I had bought a quart of raw grassfed cream for Thanksgiving and I didn't use it fast enough so it started to sour. I googled what to do with the cream once it sours and people said the butter you make with it tastes great. I put about 8-10 ounces of cream into my stand mixer and mixed away. After about 5 minutes, the cream started to turn yellow and I got excited! It finally turned into a large clump of butter. I poured the liquid (buttermilk) from the bowl into a canning jar and I rinsed the butter until the liquid was clear. Then I added himalayan salt, mixed it in, and poured it into a dish.

We have been wanting to get a cow or goat for dairy. I have wanted a goat and my husband wants a cow. After making my own raw butter, I am leaning more towards a cow because the cream separates naturally and I can make so many things with it.