Thursday, February 6, 2014

Seasoning Cast Iron and Roasted Chicken Recipe

I finally had a chance to go through a box of cast iron pans that we've picked up at yard sales. I found this large Cabela's pan, I think it's used for camping. I decided to season and start using it. I scrubbed it down with steel wool, rinsed, and dried it. I used some homemade ghee for the seasoning and also a little local beeswax. I made some pancakes on it the next day and nothing stuck! I wished I had started using this pan sooner. My old cast iron skillet is bumpy and stuff always stuck to it.

I remembered reading somewhere that someone said to cook a whole chicken in cast iron to season it so I decided to give it a shot.

Cast Iron Roasted Chicken

1 tsp himalayan salt
1/2 tsp black pepper
2 tsp homemade ghee
1 whole organic chicken
Optional:
Green beans
Onions
Carrots

Put cast iron skillet in oven. Preheat to 425F.

Rinse and dry chicken.  Rub salt and pepper all over.

When oven is preheated, add 1 tsp ghee to pan an then drop chicken in. Spread the remaining ghee on the top of the chicken.

Bake for 1 hour. After about 45 minutes I added some frozen green beans around the chicken to cook on the drippings. I would have added carrots and onions but didn't have any.

The chicken and green beans came out great!  And my cast iron skillet got some great new seasoning!

Thursday, December 5, 2013

Fudgy Carob Brownie Recipe (gluten-free, egg-free)


Since I am still nursing my son, I am still avoiding chocolate because of the caffeine content. I have tried
countless carob brownie recipes to satisfy my cravings and one worked for a while but I want something fudgy and unhealthy tasting.
I briefly experimented with amaranth and quickly learned that cooked amaranth is very gooey, not like quinoa at all. So I put it in the back of the pantry and forgot about it. While trying to find a recipe for a fudgy carob brownie I came across amaranth and realized it would be perfect in a brownie. I didn't have any eggs to spare since our hens aren't really laying much right now so this recipe is also egg free. These are the most fudgy gluten-free brownies I have ever made!

Fudgy Carob Brownie Recipe (gluten-free, egg-free, refined sugar free)

1/2 cup amaranth flour
1/4 cup coconut flour
1/4 cup carob powder
1 tbsp ground flaxseed
1/8 tsp baking soda
1/2 tsp cinnamon
2 tsp coconut sugar or honey or 1/2 tsp more stevia
1/4 tsp powdered stevia leaf
1/4 cup coconut oil
1-1 1/2 cups raw milk at room temperature
1 tbsp apple cider vinegar

Preheat oven to 325°F. Grease an 8 x 4 or similar size pan.

Mix together dry ingredients in a large bowl. Add the coconut oil and 1 cup of milk. Mix well. Add more milk if it's too thick. Mix in apple cider vinegar. Pour into prepared pan. Bake for 20-25 minutes.

Tuesday, September 24, 2013

Curing Tooth Decay and Xylitol Marshmallows


We have been battling tooth decay on our little one's teeth for the last two months now. After having a dentist tell me that she wants to fill cavities and seal my son's teeth with toxic materials, I did some research and came across remineralizing teeth. I read Rami Nigel's, Curing Tooth Decay, and have been following his protocol. We started with homemade bone broths with a raw egg yolk mixed in each serving and FCLO/BO blend. Raw goat milk kefir and cheeses were already in our diet but I stopped offering him a fruit kefir smoothie. He actually prefers the kefir plain. I slowly added cell salts and xylitol to his water. We went grain-free and I made some remineralizing toothpaste. His teeth have not gotten gotten worse so we have halted the decay.

We did remove a lot of the fruit from out diets. Although I do use fruit to bribe him into his car seat and into the house. I feel bad but sometimes I have no choice.  Since I had bought a bag of xylitol I have been looking for recipes in which to use it.  I first used it on the icing for his birthday cake which was a success. But I needed a snack that I could offer him instead of fruit. I came across xylitol marshmallows.  I have never made marshmallows so I finally decided to try making it. As I licked the bowl clean, it reminded me of the fluff that I used to eat as a kid. So I already thought it was a success.

Once it set, I cut the marshmallows into little squares and dipped them into so soaked and dehydrated raw almonds that I ground up.  My son opened the pantry looking for bananas which we are out of, so I offered him a marshmallow. He has never had candy like treats (he won't eat xylitol mints) so he cautiously tried it and ... he came back for more! I finally have a tooth friendly treat for him!

Here is the recipe I used. I halved the recipe and I did not use the stevia. Next time, I am going to try to omit the honey and up the xylitol to replace the honey. There is also this recipe which does not use egg whites that I am going to try too.

Saturday, May 12, 2012

Brown Rice Sunflower Seed Cracker Recipe


I have been making rennet cheeses lately with all the goat milk I have been getting from our goats. My husband has never liked chevre but I decided to make it anyway because of how little work is involved. He tried it after I made it and liked it but wanted crackers to eat it with. So I looked for a cracker recipe. I used this recipe as a guide but changed the ingredients to use what I have on hand. We have been out of almonds so I used raw sunflower seeds. I just used a little salt for flavor because some of the chevre I made is flavored with sweet ingredients.

As a snack, we topped these crackers with the plain chevre. Then for dessert, I topped these crackers with chevre and a drizzle of honey and my husband topped his with chevre and dried fig...so delicious! We finished the crackers in one day, so I will probably double the batch next time.

Brown Rice Sunflower Seed Cracker Recipe


1/2 cup brown rice flour
1/4 cup ground flax seed
1/2 cup sunflower seeds
1/4 tsp baking soda
1/4 tsp salt

2 tbsp coconut oil
1/4 cup water

Preheat oven to 350F degrees.

Grease a baking sheet.

Grind up the sunflower seeds. Mix all of the dry ingredients in a bowl. Add the liquid ingredients and mix until a dough is formed. Make two balls of dough.

Put one ball of dough in between two sheets of wax or parchment paper and roll out to 1/8 to 1/4 of an inch. Pull off the top sheet of paper and flip the dough onto the baking sheet. Use a pizza cutter to cut crackers into 1 to 1 1/2 inch squares. Take the edges off and add to the other ball of dough and repeat.

Bake for 15-18 minutes. (I rolled mine real thin and baked for 15 minutes.)

Let cool on baking sheet.

Makes 30-35 crackers.

This article is shared at Allergy Free Wednesdays.

Monday, April 30, 2012

Gluten-Free Egg-Free Banana Bread


I have been waiting for the two bananas on my counter to turn extra ripe so I can make banana bread. I usually make Elana's banana bread recipe but I did not have any eggs to spare so I tried to make a new egg free version with the ingredients I had on hand. This banana bread came out great! You can't tell that there are no eggs and it was NOT crumbly. I store it in the fridge and when I want a slice, I put it in the toaster oven an top with a sliver of butter.

Gluten-Free Egg-Free Banana Bread Recipe

3/4 cup brown rice flour
1/2 cup flaxseed
1/4 cup white rice flour
2 tbsp ground chia seed
1/2 cup coconut oil, melted
1/2 cup soaked almonds or walnuts, chopped
1 tsp cinnamon
1 tsp vanilla
1 tsp baking powder
1 tsp baking soda
3/4 tsp stevia powder
2 bananas, mashed
1/2 cup milk*

Preheat oven to 350F.

Grind up flaxseed and chia seed (I used a magic bullet.) Add milk to the flaxseed and chia. In another bowl, mix together the brown rice flour, white rice flour, stevia, cinnamon and baking powder. Mix well. In a separate bowl, mash bananas and add vanilla, milk, and baking soda. Mix together the coconut oil, banana mixture and flour mixture. Fold in nuts. Pour into greased 8 x 4 glass loaf dish.

Bake for 45-50 minutes.

* I have used sour cow's milk and fresh goat milk from my goats!


Tuesday, April 17, 2012

Milking Goats

Chloe
We had been trying to milk Chloe for a week an were only getting an ounce or two each time. I did try separating her for a few hours during the day from her son, but he kept getting out of the pen I put him in. We thought Chloe just wasn't a good milker and decided to put her up for sale. A registered milking goat came up on craigslist so we went to take a look at her. The seller (we told her the issues we were having with Chloe) let us milk 2 other goats as well as the one for sale just so we could see the differences. We also got to see how much milk Bambi was giving. We decided that we would take Bambi, we were just going to wait until the weekend to pick her up. She also told us to try separating Chloe from her son at night and then milk her in the morning. We separated them on Friday night.

Bambi
So Saturday morning we tried milking Chloe in the morning (We had to wait until Saturday so my husband could help me.) I could feel the milk in her udder! So I milked her. She finished all the grains while milking so I got her more and kept milking. We ended up with 12 ounces of milk! (All this time we thought that we needed a registered dairy goat to get milk; we were so wrong, You just need to learn the correct procedures to milking a goat, which Bambi's owner taught us.) So I took all the ads I posted to sell her down.

Chloe has been giving me 12-14 ounces of milk every morning since then, which has only been a few days. I am very pleased with her. She is also much better on the milk stand as she will only kick a few times and doesn't fight me while trying to milk her.

We have decided to sell her son. We are going to have to keep him separate if we want to use him for breeding purposes which means we will have to get him a male goat friend to keep him company in a separate pen. But we already know he can get out if he really wants to. Also, I have to use him to bribe Chloe on the milk stand in the mornings - too much work! Not to mention, my husband would have to build a pen for him and we would always worry about him getting out and knocking one of our goats up.

Sunday, March 18, 2012

We Got Nigerian Dwarf Goats

Baby getting milk
We already put a deposit down on a baby Nigerian dwarf doeling goat a few weeks ago when we picked up a few chickens from Okeechobee. My husband had a week off of work so he built a shelter and fenced in a section of our property for the goat. When he was done, we called the lady to pick up the goat but she has not been weaned from her momma yet so we have to wait. We decided that we also want a goat that is giving milk now as we have to wait until our first goat is a year old to breed her and be able to get milk.

2 week old buck, JJ

Off to craigslist I went looking for a goat that's already giving milk. I didn't have much luck in our area, so I searched further away. I found a momma and baby nigerian for sale but they were four hours away. My husband said no at first (he would have been the one to go pick them up as our son was not ready for an eight hour road trip.) I searched for a couple of days and found nothing else so I convinced hubby to let me email the listing for the momma and baby. My husband spent a whole day driving just to pick them up. They are so beautiful!

Momma goat, Chloe

We will try milking her in a week because we need to build a milking stand. They are still getting used to their new owners. The mom will eat out of our hands and will let us pet her while she is eating grain. I am hoping she will be more comfortable with us by the time we start milking her. For now, her baby is drinking her milk.

Friday, March 2, 2012

Mawa Recipe - An Indian Dessert


My parents are from India so I grew up eating curries and dishes made with paneer, which is made from soured milk. My mom used to make all sorts of Indian desserts with milk that she would sour with vinegar or lemon juice. She taught me how to make a few of them. It has been a while since I have made many of the desserts because hubby doesn't care for the desserts made with soured milk. I have had a half gallon bottle of sour milk in the fridge for a while now. I keep telling myself I will make rasgulla but it has not happened yet. 

This morning I finally decided to make something with the soured milk. I poured the milk in a pot and turned on the stove to the lowest setting. The milk was already so sour that I did not have to add any vinegar or lemon juice (this only happens with raw milk.) The curds started to separate from the whey. I was initially going to make rasgulla which are milk balls in a light sugar syrup. I decided that this was too many steps for today and I would not have enough free time to make it as my son enjoys my attention during the day. So I called my mom to ask her how to make the mawa (pronounced m-ow.) I had made it once before but that was many years ago.  Most of the recipes online used sweetened condensed milk, that is not the authentic way to make it - not to mention, very unhealthy! This recipe is the authentic way of making it. The only change is that I used coconut sugar and stevia instead of regular granulated sugar.


It came out perfect! Here is the recipe:

Mawa Recipe

1/2 gallon of raw milk (it can already be soured)
3 tbsp vinegar or lemon juice (only needed if milk is not sour)
1/2-3/4 cup coconut sugar
1 tsp stevia powder
shredded coconut (optional)

Pour the milk into a large pot. Turn pot on lowest setting. Once the milk heats up, it may start separating if it is already sour. If it is not sour, add the vinegar or lemon juice. You will see the curds start to separate. You can turn the heat up a little as the milk has to reduce to a pudding consistency. Keep stirring every 10-15 minutes. Once the milk had reduced to half, add the sweeteners (add more or less based on your preferences, just remember that the milk will reduce more so it will get sweeter as it reduces.) Mix the sweeteners through and keep stirring so the milk doesn't burn or stick to the pot. The cooking process will take about 2 hours. You will know it is done when it is a very thick consistency. The color should be a nice tan.

Grease an 8 x 8 glass or pie dish. Let the mixture cool for about 10 minutes in the pot, then scoop into dish and pat down. Sprinkle with shredded coconut, if desired, and press down a little. Put in fridge and let cool.

Cut into bars and serve.


Friday, February 17, 2012

What Kind of Oats Should I Buy?


There are many different ways you can buy oats - oat groats, steel cut oats, rolled oats, old fashioned  rolled oats, quick oats, instant oats, irish oats, and scottish oats. We have been having oats a couple of times a week since learning the correct way to prepare them. I have been buying organic old fashioned rolled oats and I was going to update my amazon subscribe and save account when I decided to research which oats are the least processed and healthiest to purchase. I will explain the differences below:

Oat groats are the the hulled oat grain. This is the most unprocessed version that you can get at the health food store. Oat groats look like brown rice. I have never cooked with oat groats.

Steel cut oats or Irish oats are oat groats that have been cut into three or four pieces with steel blades. This is the most nutritious version of oats that people are used to eating because it still contains the oat bran and it is NOT steamed before it gets to the consumer. These oats are also more chewier when cooked.

Scottish oats are oat groats that are ground up to make a porridge creamy style of oatmeal.

Rolled oats are made by steaming the oat groats and then using a roller to flatten them, hence the name "rolled" oats. Old fashioned rolled oats are thicker because they are made with the whole oat groats. Quick cooking rolled oats are made using steel cut oats.

Instant oats are quick cooking rolled oats that have been steamed longer and are rolled more thinly. These are the least nutritious of all oats because the steaming cooks the oats which reduces the nutritional value.

I am currently using old fashioned rolled oats but I plan on switching back to steel cut oats after learning the differences. I don't like how the rolled oats are steamed before they get to me, the consumer. I do prepare my oats the correct way by soaking them for 12-24 hours in water and sour milk which reduces the phytic acid making the oats more digestable. I then proceed to cook them by making baked oatmeal or soaked oat breakfast bread.

Wednesday, February 8, 2012

A Few More Hens...And A Goat!


We are happy with our three hens but eat more eggs than they can produce so we wanted four more hens. I found a farm on Craigslist that was selling chickens, organic produce, and eggs. We drove an hour away to Okeechobee to purchase more hens for our flock. When we got to the farm, the woman I had spoken to over the phone, Jennifer, seemed very knowledgeable about chickens, goats, and organic farming. We were there a while just talking. I had not met anyone with the same views on on the food we eat until now. People always think that I am crazy and go overboard about the foods that we eat. She understood and has the same views!

On the drive in, we saw her goats (we did not know this was a complete farm with goats.) She had two baby goats in the same pen as the chickens and we got to talking about goats. She then walked us over to the older goats. The baby goats were dwarf nubian goats and she said they were good milking goats and very easy to take care of. Well, we put down a deposit for the baby girl she had. She said that most people buy her goats for meat and she was happy that we were buying her to milk. Jennifer knew that we don't have shelter for the goat yet so she said we could pick her up when we have shelter for her.

We did get four barred rock cochin hens. Fortunately, on the way there we bought a large dog crate at a yard sale for $25. Otherwise we would have had to put them in our animal trap and a cardboard box. The dog crate is also the perfect size for transporting our goat. This was a great yard sale score!

Temporary DIY Chicken Coop


We tried using scrap wood and materials we already had had to make our temporary chicken coop. We had some wood fence panels, pallets, black landscape pot, wood fence post, chicken wire and cinder blocks. A small part of our backyard is fenced in with a chain link fence, so we used the chain link as one side of the coop. We then laid the wood fence panels up against the chain link fence to make a tee pee. Then we put one pallet on each end to work as a door and put a cinder block up against it. We then used chicken wire to cover up any holes that the pallets did not cover.


For a roost, we put down two cinder blocks 2 to 3 feet apart in the coop and put a fence post we had lying around on top of the cinder blocks.

The nesting box was made from a 5 gallon black landscape pot nailed on its side to a small pallet. The pallet was put on to of two cinder blocks to keep it off the ground.


We have every type of predator here that preys on chickens. This coop kept our chickens safe from hawks, raccoons, bobcats, opossum, foxes, rats and any other predator that I am not aware exist in our area.We set up our animal trap near the coop to catch any predators that may try to get our chickens. The first night, we caught a muskrat. I assume this is the same muskrat/rodent that dug up my freshly planted herbs the week before.

Monday, January 30, 2012

Frugal Lunch: Leftover Meat Puttanesca

Leftover Meat Puttanesca

The other night we had penne with meat sauce for dinner. There was enough leftovers for a light lunch for one. I somehow had to turn this into a hearty lunch for two. The previous day, I had soaked all my garbanzo beans to cook and freeze for future use (I avoid all canned foods as most cans are lined with toxic bpa which leaches into the food.) I decided to make a puttanesca with whatever I had in the fridge. We enjoyed it so much that I am making it again for tomorrow's lunch with leftover roast chicken. The best part about this recipe is that you can leave out or add in whatever you have or don't have in your kitchen. The garbanzo beans have enough protein to make this a hearty meal even if you don't have any leftover meat. Here is the basic recipe:

Leftover Meat Puttanesca Recipe


1 cup leftover meat (spaghetti sauce w/meat , roast or boiled chicken, can of sardines etc.)
1 cup leftover brown rice pasta or cook up the desired amount of pasta
1 bunch  chopped swiss chard, kale, or mustard greens
1 1/2 cups cooked garbanzo beans
1/2 chopped onion or 1 tsp onion powder
3 cloves garlic or 1 tsp garlic powder
1/2 - 1 cup pasta sauce or chopped tomatoes
1 tsp oregano
1 cup chopped sweet peppers
1/4 tsp crushed red pepper
1/4 cup chopped olives
salt and pepper to taste

Optional:

top with cheddar or mozzarella cheese

Saute the onion, stems from the greens, and garlic until soft. Add sweet peppers and cook for a couple of minutes. Add everything else except olives and heat through. Turn stove off and add the olives and mix. Serve in bowls and top with cheddar or mozzarella cheese.


Tuesday, January 17, 2012

Creamy Chicken and Vegetable Soup


I've started roasting or boiling a whole chicken every week. I always try and make something new with the leftover chicken. I had made all this chicken broth the other day so I wanted to make a soup but I was craving a creamy soup. So I came up with this creamy chicken soup recipe. My husband said it tasted like pot pie. You can really add whatever vegetable you have on hand. I would have loved to add some celery, spinach, and/or mushrooms if I had some. If you add fresh spinach, add it at the end with the milk. I also made this gluten-free by using potato starch as a thickener. Here is the recipe:

Creamy Chicken and Vegetable Soup Recipe

16 oz homemade chicken broth
4-5 carrots, chopped
1 bag of frozen peas or any frozen vegetables you have on hand
2 sprigs of lemongrass or 1 inch of ginger, grated
2 cloves garlic, minced
2 cups deboned roast chicken
1/2 cup onion, chopped

1/2 tsp black pepper
1/2 tsp himalayan salt
1/2 tsp poultry seasoning
2 cups raw milk (I used soured milk)
3 tbsp potato starch
Brown rice to serve with

Pour chicken broth, chopped carrots, onions, and garlic into pot and bring to boil. Lower heat to simmer and cook for 10 minutes. Add lemongrass or ginger, poultry seasoning, salt, and black pepper. Cook for 10 minutes. In a small bowl mix together 1/2 cup of milk and potato starch. Add the remaining milk to the pot and stir. Add potato starch mixture to the pot and heat until thickened, about 10 minutes.

Serve over brown rice.

Wednesday, January 11, 2012

Soaked Oat Breakfast Bread


Over the long holiday weekend, I tried a new breakfast recipe. It was for a soaked berry oat breakfast bread. I have been trying to stay away from grains but some days can't seem to get full unless I have some grain. I have recently learned about soaking grains prior to cooking them from the Weston A. Price Foundation. Soaking reduces the phytic acid which increases the ability of your body to absorb the vitamins and minerals from the grain and reduces enzyme inhibitors which in turn makes the grains easier to digest. The first recipe I tried was a baked oatmeal from soaked grains which I enjoyed. So I looked for more soaked grain recipes. I have made this berry oat breakfast bread a few times now, but I altered it every time to my liking. When I saw the recipe, it reminded me of Entenmenn's cheese danish I used to eat when I was a kid, so I added a cream cheese mixture, among other changes. Here is my version:

Soaked Oat Breakfast Bread

4 cups freshly ground organic rolled oats, (I blended oats in a magic bullet)
2 cups raw sour milk
3 tbsp coconut oil
1 tsp maple syrup

Mix the above in a large bowl. Cover and put in oven 12-24 hours to soak.

The next morning:

1/2 cup water
1 tsp himalayan salt
2 tbsp cinnamon
1 tsp baking soda
1 tsp baking powder
1 tsp vanilla
2 tbsp maple syrup
1/2 cup blueberries
2 bananas, mashed
1/2 cup raw walnuts, chopped
2 tbsp chia seeds
4 free range eggs

Cream Cheese filling:

4 oz cream cheese
3 tbsp maple syrup

Preheat oven to 350 degrees.

Add the water, salt, cinnamon, baking powder, baking soda, vanilla and maple syrup to the bowl of oats and mix. Beat the eggs and bananas together in another bowl. Add to oat mixture and mix until combined. Stir in the blueberries, chia seeds, and walnuts. Pour into 2 greased 8x8 or round casserole dishes.

In a separate bowl mix cream cheese and maple syrup. By the tablespoon full, drop this mixture into the dishes. There should be one dollop for each slice you plan on cutting. I put four dollops into each dish.

Bake for 30 minutes.

Serve with a tablespoon of butter on top.

8 servings


Monday, January 9, 2012

Natural Burn Remedy That Works - Aloe

I had dinner in the oven and was trying to get all the dishes done before the casserole was done cooking. I grabbed the saucepan off the stove to wash, not realizing it was still hot, and put my hand on the bottom. Owww! This was the worst I had ever burnt myself. I put a bag of frozen green beans on it but realized I had to do more because this was a really bad burn. My husband was on the computer so I asked him to look up what to put on a burn. He said aloe will work so he went outside and pulled some aloe off one of our aloe plants. Within minutes the burning had stopped. I kept re-applying the aloe until I went to bed and the next morning I was fine. No blisters. Two of my fingers were slightly red but no pain. Aloe really works for burns! Every cook should have an aloe plant in their backyard just for burns. Now that I have discovered this remedy, I will never have another burn scar on my hands again.

Thursday, January 5, 2012

Homemade Dishwasher Detergent Without Borax and Citric Acid


I have been wanting to make my own laundry detergent for a while. I researched the ingredients needed and all the recipes included borax. I looked at our current detergent be Seventh Generation and it has borax in it so I assumed it was fine to use. I was going to order borax online when my husband asked me how safe it was to use. I checked its rating on the Skin Deep database and it is listed as a 5-6. It also says not to use on infant skin. So I did not order the borax and instead searched for recipes that did not include borax. I ordered the washing soda online because it was cheaper that way and I do not know where to get it locally.

I never got around to make the laundry detergent but we were out of dishwasher detergent so I found a recipe online. I had to look for a recipe without citric acid because I did not have any but I had lemon juice which I thought would do the same thing. I found a recipe for dishwasher detergent at http://bonzaiaphrodite.com. The only change that I made was to use Seventh Generation dishwasher soap instead of castile soap.


Homemade Liquid Detergent Recipe

1 1/2 cups water
1/2 cup distilled white vinegar
1/4 cup liquid dish soap
2 tablespoons pure lemon juice
2 tablespoons salt
1 tablespoon washing soda


Combine all the ingredients in a non-reactive saucepan over medium heat. Mix until everything has dissolved. Remove from heat and let cool. Pour into glass container. Shake before using. Fill dishwasher compartment and pour white vinegar into rinse compartment.

I have used this twice now and it cleans as good as my Seventh Generation dishwasher detergent did and this is so much cheaper!

Wednesday, January 4, 2012

Homemade Raw Milk Yogurt

I have made yogurt once before a few years ago with raw milk and it came out good. But I never made it again as I never had the time. My mother has always made her own yogurt since I was a kid. She always boiled the milk first. I have since learned that raw milk is more nutritious and boiling the milk kills the good and bad bacteria. We only buy raw milk now, at least until we have our own goats and cow. We had too much milk in the fridge so I decided to make some yogurt as I have been craving a yogurt smoothie.


I boiled some water and poured it into the mason jar I was going to use to sterilize it. Then I heated up the milk. I don't have a thermometer so I guessed the temperature. It was probably around 100 degrees. I was really just trying to get it a little warmed up. Then I put a heaping tablespoon of store bought yogurt. I used Stoneyfield Farms plain yogurt. I stirred it with a spoon, covered it, and put it in the oven with the light on overnight. In the morning I had beautiful yogurt. You could see the cream floated to the top. The yogurt tasted amazing and it was nice and thick, not watery at all.

Saturday, December 31, 2011

We Got Chickens at a Yard Sale


Like every Saturday morning, we were out going to yard sales. Our son actually didn't mind the car ride this morning. The last few weeks he has been fussy and we had to cut our trips short and come home. This morning he napped the whole trip. I noticed a dozen eggs on a table at the first yard sale we stopped at. (Lots of people in our area raise their own chickens and some sell the extra eggs, they just put a sign up in front of their house.) We asked about the eggs, then I heard the chickens clucking. We started talking to these people and they were selling chickens too!

Just yesterday, I had called a farmer on craigslist to ask about their chickens and was told their hens won't be ready for sale for another two weeks. Our chicken coop was ready for chickens and we could not get chickens.

Today was our lucky day. When we left the house this morning, we had no idea we would come home with chickens. This couple sold us three chickens since that was all that would fit in our animal trap/cage. My husband wanted to make a second trip and get three more, but I wanted to wait a few days so we can learn how to take care of chickens before getting more. They also told us where to get free hay for the nesting boxes, what kind of feed to get, and warned us of predators getting into the coop. We got two Leghorns and one Rhode Island Red. My husband actually caught one of the chickens to put into the cage!

We could tell these people have taken good care of their chickens because they are so friendly. The chickens seem really happy in their coop. They have been eating bugs all day!

Thursday, December 29, 2011

Broccoli Ricotta Casserole


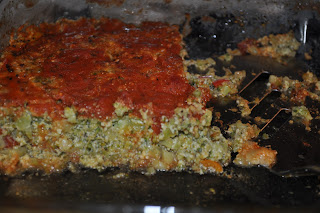
Hopefully, everyone had a great holiday weekend. This was our first Christmas with a baby, so it was a whole new experience. He wasn't old enough to actually open his presents so we opened them for him. I haven't posted in a few days because my husband has the week off so I've been a little distracted to post. We started working on our temporary chicken coop in the last couple of days. We just need to get food, pine shavings, and chickens. We will be doing that either today or tomorrow. I have tried a lot of new recipes since my last post but forgot to take pictures of most of them. I did get a picture of my broccoli casserole.


I had a head of broccoli and ricotta that I needed to use up to go with a pizza I was making. I googled broccoli casseroles and all the recipes were more like frittata bakes (they had a lot of eggs.) This was not what I was looking for. Then I remembered we were over at a friend's house for dinner a while back and had an eggplant lasagna type of bake without pasta. So I decided to try and make my own version of that with broccoli. This dish turned out to be delicious!

Broccoli Ricotta Casserole

1 large head broccoli
12 oz ricotta cheese
2 eggs
1/2 cup sweet peppers, chopped
1 cup mozzarella
1 tsp black pepper
1/2 tsp himalayan salt
1/2 tsp garlic powder
1 cup pasta sauce

Preheat oven to 350F.

Chop up the broccoli and put in food processor with s blade. Process until broccoli is little tiny pieces. Place in bowl. In a separate bowl mix together ricotta, eggs and mozzarella. Combine both mixtures along with peppers, black pepper, salt, and garlic powder.

Grease and 8 x 8 casserole dish. Pour half of pasta sauce in casserole dish. Pour broccoli mixture on top. Cover with remaining sauce. Cover and bake for 30 minutes.

Thursday, December 22, 2011

Frugal Gift Wrapping


I have never seen a point in buying gift wrap. The receiver just rips through it and in the garbage can it goes. Not to mention all the trees that are cut down just for gift wrap that goes in the trash immediately after the gift is opened. We try and recycle as much as we can so using the comics section from the Sunday paper is a good way of recycling. After the gifts are opened, we then recycle the paper. So we end up getting an extra use of the paper before recycling. I usually start saving my comics in November and I end up with extra comics. Now, my brothers always makes fun of my choice of paper for wrapping gifts but they are not as frugal as I am and they find all sorts of new reasons to mock me. I did immediately notice at my baby shower, one of my good friends did wrap my gift with comics! I was so happy to see that others do think the same way I do. We also save gift bags, bows, and tissue from gifts that we receive and we reuse these at a later date. Above, you can also see my homemade granola in a canning jar where I used comics in between the ring and the lid.


Here, I made a bow using an old Christmas card. I just the card in to 2-3mm strips. Then curled each end with my fingers. I put a piece of tape in the middle (either use double sided tape or fold a piece of tape over so both sides are sticky) then arranged the strips on top of the tape so they would stick. You can also tape something to the middle like I did in the first picture, I taped a little square i the middle. If anyone has frugal gift wrapping ideas, please share by commenting. Happy wrapping!!!